


A Breeze from Home ~ Nasi Uduk Betawi
First, let's take a moment to commemorate the tragedy that has just whipped Indonesia again back on its knees. The surge of news of the earthquake that hit the less-fortunate part of Yogyakarta was very devastating. These poor people have nothing left and they wish sincerely for our help. Please kindly spare a change to help them overcome this nightmare. Visit Indonesia Help for more information and links to donate.
Now let's step aside and explore more of Indonesia cuisine. In this post, I'd like to present you with this traditional dish from Jakarta, Nasi Uduk Betawi. The name itself literally means Betawi Uduk Rice.
"What is Betawi", you may ask. Well, I have a little introduction I'd like to share. This is only based on my elementary and junior high school history class and I didn't do any research [too lazy!]. Betawi is actually another name for Indonesia's capital city. During the Dutch occupation this place was called "Batavia" while the native Indonesian called it Sunda Kelapa. It was one of the important harbours where merchants underwent trading with the Europeans. Indonesia was renowned as a source of spices and it became a very valuable commodity. That was one of the reasons why the Dutch occupied Indonesia in the first place.
In the fight for independence, Indonesian troops leader decided to declare Sunda Kelapa as the capital city of Indonesia, changed the name into Jayakarta and then announce the letter of independence there. Not long after, the name was shortened into Jakarta. However, this highly dense city is still known as Betawi, especially by the suburban [read: village] people. They have their own unique culture and are proud of it. One of the tradition they're proud of is this Nasi Uduk! It's normally served with Indonesian fried chicken and spicy peanut sauce.
One outstanding, yet often ignorable, ingredient in this recipe is coconut milk. As you all in Canada know, we can conveniently purchase a can coconut milk sold at the grocery stores. What you'll get from the can is the thick creamy liquid oozing with distinctive fragrance. However, the authentic coconut milk is not the same. I must say, it's irreplaceable by the canned version.
I'm not saying that canned coconut milk is bad, it's just too concentrated and it takes away the subtleness that it should be offering. Thus, I'm going to use this opportunity to give a tutorial in making FRESH coconut milk. Are you guys with me so far?
For some of you, this might be a custom already. It is a usual thing back home. We would get fresh old coconut [not the young one!], already halved, from the market in the morning. Then make coconut milk with freshly grated coconut. There are two kinds of coconut milk. The light one and the thick one. Most of Indonesian dishes are happy with the light one, which contains more water. To make the thick one, you'd have to let the light coconut milk stand for a few minutes, the coconut cream would separate from the water. Then, scoop up the creamy part. That's you thick coconut milk! Now, I'm just going to show you to make the light one.
I was lucky enough to have finally found this coconut [imported from Costa Rica] at Price Chopper. I've never seen them anywhere else.
First, you will need a hammer to crack open this whole coconut. From my experience, I used a large knife and all of my energy to break it in halves. It was very exhausting and itme-consuming! So, I recommend you to use a hammer.
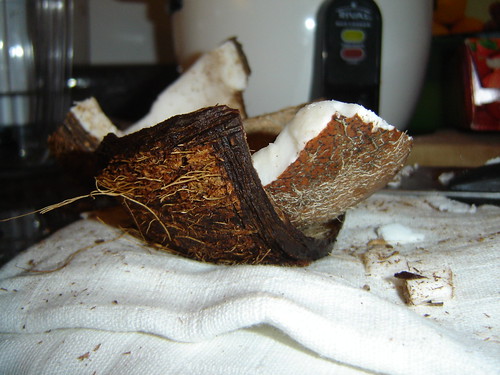
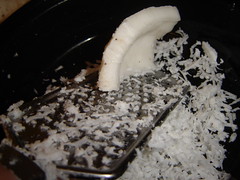
After you've cracked it in halves, try to halve them again. So You'll end up with quarters of coconut [just like the one you see at the top of this entry]. The reason why you might need to do this is that this process makes it easier to get the tough shell off. Afterward, you can easily peel off the inner skin with a knife.
You're ready to dessicate the coconut now!
Have a grater ready, and position your coconut quarter [one at a time!] like the picture below so that you'll get longer strands of grated coconut. Do not do it any other way or you won't be able to extract the milk out of the coconut.
After you get all of your coconut grated, put it in a bowl then pour 500ml of warm water into it. Let it stand for 5 minutes. Stir it with your hand once in a while.
Get a sieve ready over another bowl. Grab a handful of grated coconut that has absorbed the water and start squeezing the liquid out. Continue until you finish the rest of the coconut.
That's it my friend. Simple and easy, huh? [not including the part where I had to crack open the coconut] And you'll get the fresh coconut milk canned version could not offer!
Now, we'll utilise this freshly squeezed coconut milk to make my mom's hometown traditional dish, Nasi Uduk Betawi. Here's the recipe:
Direction:
01. Cook the coconut milk along with salt, bay leaves, lime leaves, and lemongrass in a medium-sized pot. Bring it to boil, then simmer immediately.
02. Stir in the half-cooked rice into this mixture. Stir with wooden spoon until the coconut milk is absorbed by the rice. Remove the bay & kaffir lime leaves and lemongrass.
03. Continue to steam until the rice is fully cooked.
Note: If you think the coconut milk is too much or too little, please adjust it yourself. I was cooking by proxy at that time.
Serving suggestions:
Now let's step aside and explore more of Indonesia cuisine. In this post, I'd like to present you with this traditional dish from Jakarta, Nasi Uduk Betawi. The name itself literally means Betawi Uduk Rice.
"What is Betawi", you may ask. Well, I have a little introduction I'd like to share. This is only based on my elementary and junior high school history class and I didn't do any research [too lazy!]. Betawi is actually another name for Indonesia's capital city. During the Dutch occupation this place was called "Batavia" while the native Indonesian called it Sunda Kelapa. It was one of the important harbours where merchants underwent trading with the Europeans. Indonesia was renowned as a source of spices and it became a very valuable commodity. That was one of the reasons why the Dutch occupied Indonesia in the first place.
In the fight for independence, Indonesian troops leader decided to declare Sunda Kelapa as the capital city of Indonesia, changed the name into Jayakarta and then announce the letter of independence there. Not long after, the name was shortened into Jakarta. However, this highly dense city is still known as Betawi, especially by the suburban [read: village] people. They have their own unique culture and are proud of it. One of the tradition they're proud of is this Nasi Uduk! It's normally served with Indonesian fried chicken and spicy peanut sauce.
One outstanding, yet often ignorable, ingredient in this recipe is coconut milk. As you all in Canada know, we can conveniently purchase a can coconut milk sold at the grocery stores. What you'll get from the can is the thick creamy liquid oozing with distinctive fragrance. However, the authentic coconut milk is not the same. I must say, it's irreplaceable by the canned version.
I'm not saying that canned coconut milk is bad, it's just too concentrated and it takes away the subtleness that it should be offering. Thus, I'm going to use this opportunity to give a tutorial in making FRESH coconut milk. Are you guys with me so far?
For some of you, this might be a custom already. It is a usual thing back home. We would get fresh old coconut [not the young one!], already halved, from the market in the morning. Then make coconut milk with freshly grated coconut. There are two kinds of coconut milk. The light one and the thick one. Most of Indonesian dishes are happy with the light one, which contains more water. To make the thick one, you'd have to let the light coconut milk stand for a few minutes, the coconut cream would separate from the water. Then, scoop up the creamy part. That's you thick coconut milk! Now, I'm just going to show you to make the light one.
I was lucky enough to have finally found this coconut [imported from Costa Rica] at Price Chopper. I've never seen them anywhere else.
First, you will need a hammer to crack open this whole coconut. From my experience, I used a large knife and all of my energy to break it in halves. It was very exhausting and itme-consuming! So, I recommend you to use a hammer.
After you've cracked it in halves, try to halve them again. So You'll end up with quarters of coconut [just like the one you see at the top of this entry]. The reason why you might need to do this is that this process makes it easier to get the tough shell off. Afterward, you can easily peel off the inner skin with a knife.
You're ready to dessicate the coconut now!
Have a grater ready, and position your coconut quarter [one at a time!] like the picture below so that you'll get longer strands of grated coconut. Do not do it any other way or you won't be able to extract the milk out of the coconut.
After you get all of your coconut grated, put it in a bowl then pour 500ml of warm water into it. Let it stand for 5 minutes. Stir it with your hand once in a while.
Get a sieve ready over another bowl. Grab a handful of grated coconut that has absorbed the water and start squeezing the liquid out. Continue until you finish the rest of the coconut.
That's it my friend. Simple and easy, huh? [not including the part where I had to crack open the coconut] And you'll get the fresh coconut milk canned version could not offer!
Now, we'll utilise this freshly squeezed coconut milk to make my mom's hometown traditional dish, Nasi Uduk Betawi. Here's the recipe:
Nasi Uduk Betawi
4 cups Jasmine rice, washed, half-cooked
700 ml thin or light coconut milk
1-1/2 tsp salt
2 bay leaves
2 kaffir lime leaves
2 lemongrass, white part, crushed
4 cups Jasmine rice, washed, half-cooked
700 ml thin or light coconut milk
1-1/2 tsp salt
2 bay leaves
2 kaffir lime leaves
2 lemongrass, white part, crushed
Direction:
01. Cook the coconut milk along with salt, bay leaves, lime leaves, and lemongrass in a medium-sized pot. Bring it to boil, then simmer immediately.
02. Stir in the half-cooked rice into this mixture. Stir with wooden spoon until the coconut milk is absorbed by the rice. Remove the bay & kaffir lime leaves and lemongrass.
03. Continue to steam until the rice is fully cooked.
Note: If you think the coconut milk is too much or too little, please adjust it yourself. I was cooking by proxy at that time.
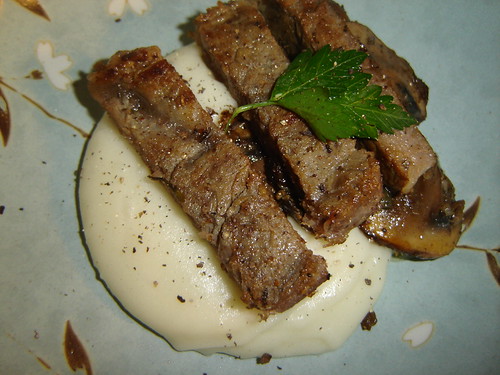
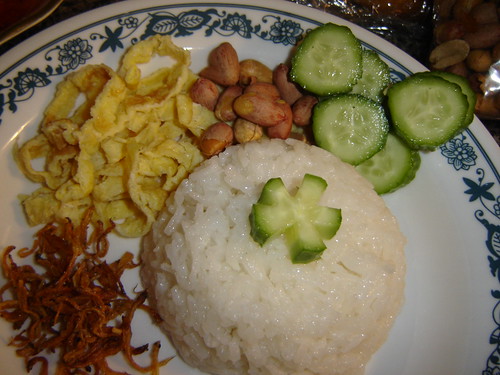
Serving suggestions:
- Sliced plain omelettes [make a thin layer of plain omellete, with salt and pepper only, then slice it into strands]
- Dry-roasted peanuts [normally found in Chinese groceries]
- Fried dried anchovies
- Fresh sliced cucumbers
- Chili sauce [SriRacha] or spicy peanut sauce
Enjoy it!
posted by little pomelo @ 5:58 PM
5 comments
![]()
![]()